 For my 25th post, my mum got me a very, very nice present; ‘Cook with Jamie, My Guide to Making You a Better Cook’ !
I read about this new book a few days ago, told my mum I really liked it, and as a surprise she immediately went out and bought it for me… =)
Cook with Jamie (already his 7th book!) is a beautiful - 450 pages thick - kitchen bible and is divided in 6 chapters; salads, pasta, meat, fish, vegetables and desserts.
Each chapter begins with a little info about the ingredient, a good basic technique and some handy tips and tricks. The principle is to first master the basics, be able to make the fundamentals for good authentic food, and than start mixing and experimenting and let all the flavours flow with about 8 different variation recipes, all made from that first basic recipe.
 Become Jamie’s student in your own home…(!)
I absolutely love this book. I’ve always liked Jamie Oliver and his TV shows, I think he’s a great guy with his school dinners and 15 project, but I didn’t really like all his commercial stuff; tefal series, flavour shakers, table wear and god knows what.
I’m glad this book is simply about good food, learning and enjoying it.
Wanting to use my lovely new book immediately, I made this Spinach Risotto with Goat’s Cheese as a surprise Saturday night dinner.
Making risotto isn’t difficult at all.
You just have to have some timing and patience, since you really have to stand the whole time next to the pan - My rice was cooked exactly long enough; soft and oozy but still with a good bite.
I’m not really used to make something that doesn’t involve baking or isn’t sweet, but I have to say I really like it. Especially if I get an outcome as this…!
Intensely flavoured, slightly perfumed from the wine, a bit cheesy and wonderfully creamy. What’s a better dinner than a big, hot and steamy bowl of risotto mixed with soft spinach, slightly sour goat’s cheese and a bit of tangy lemon??
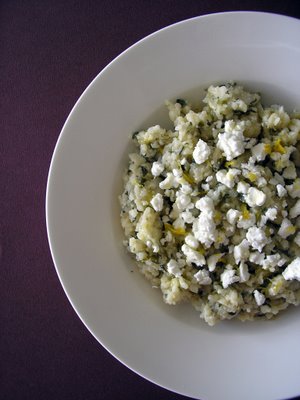
After making the basic risotto recipe, the rice will be ready for 75%
The idea is you’ll finish it off with a following recipe
Perfect if you have people over for dinner - make the base in advance and just leave it until you need it!
Spinach Risotto with Goat’s Cheese
based on Jamie Oliver’s recipe from Cook with Jamie.
(according to Jamie it serves 8, but if you want a good hearty portion, don’t count on more than 4 or 5 portions!)
ingredients for the basic risotto:
- 1 Litre (1 ¾ pint) vegetable stock
- 2 Tbsp olive oil
- 1 Tbsp butter
- 1 large onion, peeled and finely chopped
- 6 sticks of celery, trimmed and finely chopped
- 600g (1lb 6oz) risotto rice
- 250 ml dry white wine
extra ingredients for the spinach risotto with goat’s cheese:
- 75g (2/3 stick, 1/3 cup) butter
- olive oil
- 1 clove of garlic, peeled and chopped
- nutmeg, for grating
- 250g (9oz) spinach, washed and dried
- sea salt and freshly ground pepper
- 700 ml (1 ¼ pint) vegetable stock
- 1-2 hands freshly grated Parmesan Cheese
- ½ a lemon
- 200g soft goat’s cheese, crumbled
- extra virgin olive oil
Basic risotto:
If you make the risotto in advance, oil a large tray and set aside.
1. Bring the stock to a simmer in a saucepan.
Put olive oil and butter in an other large pan, add onion and celery and cook very gently for about 10 minutes, without colouring, until soft.
2. Add the rice and turn up the heat - keep the rice moving
Pour in the wine and keep stirring all the time until all the alcohol has evaporated, leaving the rice nicely perfumed.
3. Add the stock to the rice a ladle at a time, stirring and waiting until it has been fully absorbed before adding the next. Turn the heat down a bit to prevent cooking the rice to quickly, (the inside will than be very hard!) and continue to add ladlefuls of stock until it has all been absorbed. This takes about 15 minutes. The rice now begins a bit to soften, but is still quite hard.
4. Scoop the part-cooked rice out on the waited oiled tray, spread it out evenly and not to thick (otherwise the rice will cook itself!) and put the tray somewhere to cool down.
When it’s completely cooled, scrape it carefully all in a Tupperware container with a lid and keep it in the fridge until you want to use it.
The rice will keep for a couple of days.
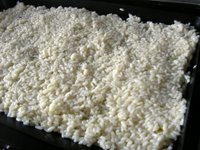 Now you’ll have a perfect risotto base. Finish it off with the following recipe;
Spinach Risotto with Goat’s Cheese:
1. Heat a medium saucepan, spoon in a tablespoon of the butter and add a splash of olive oil, the garlic and a good grating of nutmeg.
When the butter has melted, add the spinach. Cook for 5 minutes, moving it until it’s wilted down. A lot of the liquid will cooked away and a dark intensely flavoured spinach will be over. Chop finely and season with salt and pepper to taste. Heat up your stock in a medium saucepan (the same one) and bring to a simmer.
2. Put a different large saucepan on medium high heat and pour in half the stock followed by all your risotto base. Stirring all the time, gently bring to a boil, and cook until most of the stock has been absorbed. Add the rest of the stock a ladle at the time until the rice is cooked. (check and taste when it’s perfect and a real pleasure to eat - still holding it‘s shape but also soft, creamy and oozy)
3. Turn off the heat, and stir in your spinach, butter and parmesan. Add a good squeeze of lemon juice, season with salt and pepper and leave the risotto to rest (with the lid on) for a minute. Fold in half of the goat’s cheese, stir well and scoop your portions on the plates. Finish off with the rest of the goat’s cheese, some lemon zest, a little drizzle of extra virgin olive oil and a bit of grated Parmesan…enjoy!


