Showing posts with label all recipes. Show all posts

Wednesday, January 3

2007...

A new year, a new beginning.
Good resolutions, firework, lots and lots of oliebollen and a chance for 20 million in the new years eve lottery.
That last one didn’t come true of course, but the oliebollen part made it up quite all right…

As I already let you know with my ‘Things to Eat before You Die’-list, oliebollen are one of my favourite things in the world.
But, needless to say, only oliebollen from my family recipe. The average bol that is sold during this time of year in the special pastry stalls is a bit too greasy for my taste and has nothing, or maybe, when you’re lucky, 4 raisins as filling. Not really my taste. We like our bollen as they were made intentionally: properly filled. The trick is to use eggs, lemon zest ànd juice and lots and lots (and lots) of apples, raisins and currants. A delicious, sweet, airy and moist bol with a golden brown, crispy layer will be the result.

I love oliebollen. It’s strange you can attach so much to customs; it happens still occasionally through the year, mid June for example, that I would kill for a fresh, still warm bol - we however haven’t made them ever on a different day then the 31st. It’s just not right. We wait a year, and then eat for 3 days nothing else than oliebollen. Period. (and we are of course at least a month sick of them afterwards…) ;)

Oliebollen are one of the most well-known Dutch things. Although not everybody makes them their selves, making them is in our family a true tradition. We start bright and early with our batch, call how it’s going with the others and the next day tasting and comparing the golden beauties with the rest…

So, a new year.
"Let's hope it's a good one, without any fears."
Up to new starts, hopes, wishes, opportunities and chances.
And of course...Tasting Life!


Superbollen, Oliebollen
(“dough balls”) makes about 45
- 800g (6 cups) flour
- 16g (1 Tbsp) salt
- 4 eggs
- 40g fresh yeast
- 0.6L (2 ½ cups) milk
- 2 Jonagold apples
- 3 Goudreinet apples (if you don’ have these apples, just use firm, sour apples)
- 200g yellow sultana raisins,
- 200g blue sultana raisins,
- 200g currants
- 3 lemons - the zest of 3 lemons, and the juice of 1/2 lemon
- 100g (1 stick/½ cup) butter

- a deep-frying pan with fresh deep-frying fat (sunflower oil)
- kitchen paper and napkins
- powder sugar

1. In a small saucepan, heat about 0,2L (1 cup) of the total 0.6L until it’s tepid. (about 40°C - 104°F) Pour the warm milk in a small bowl and crumble the yeast over it. Stir gradually until it’s completely dissolved, cover up and set to rest on a warm place.

2. Peel the apples, chop them in 4 pieces, remove the core, and cut the parts into tiny little pieces. Put the apples together with the raisins, currants, lemon juice and lemon zest in a large bowl and mix well.

3. In the biggest basin you have, (or a clean bucket) sift together the flour and salt. Make a small hole in the centre and insert one egg. Mix with the electric mixer fitted with the dough hooks until the egg is completely inserted. Then add the second egg and repeat this process until all eggs are added.
In a small pan, melt the butter. Heat in the ‘milk’ pan the rest of the milk until tepid.
Add to the flour/egg mixture the yeast mixture that was resting and mix until well blended. Add the rest of the milk and mix until combined, to end with mix the melted butter in. Change the dough hooks for the whisk hooks and mix until the whole mixture is one smooth mass. Scoop the filling in, mix well, cover up with a damp towel and set to rest on a very warm place for 1 to 2 hours. Now the dough will have risen and doubled in its size…

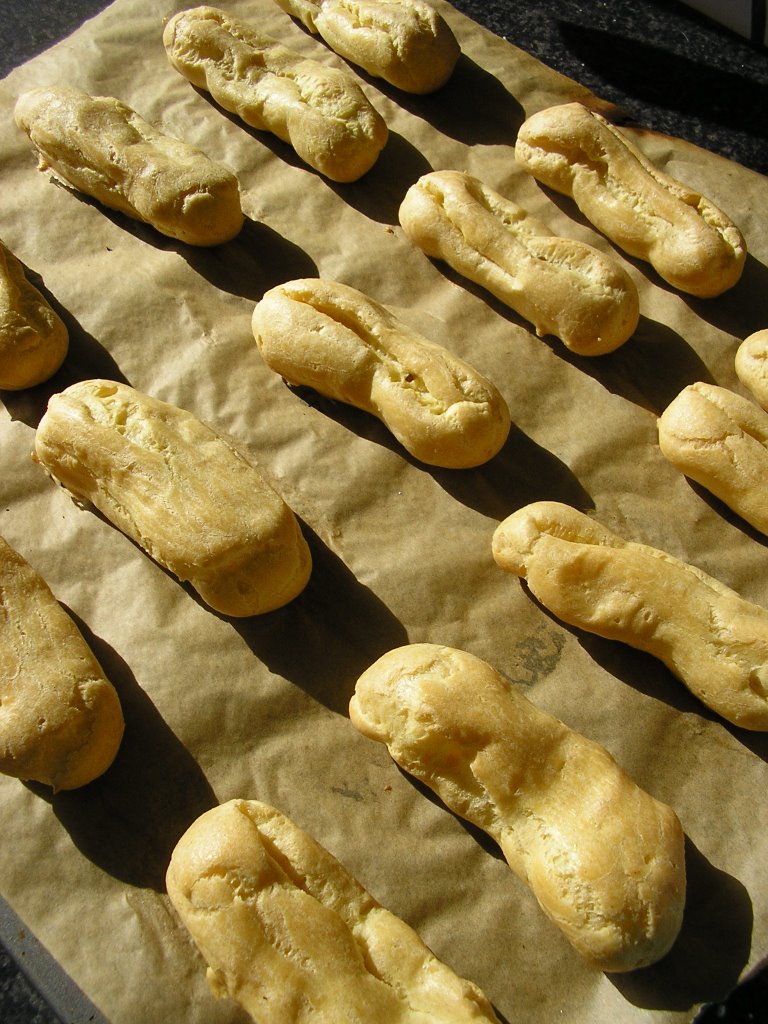
4. Heat the deep-frying fat until it reaches 180ºC. take an ice scooper or two tablespoons and stick the spoons in the heated fat for a couple of seconds. (this will prevent the batter from sticking to the spoons) take a big spoon full of dough, round it a bit, and carefully dip it into the oil. Repeat this, but don't have more than 6 of them into the oil at the same time (this also depends on the size of your pan). Fry the 'oliebollen' for 6 minutes, 3 for each side, until they are nice gold brownish.


5. Take the oliebollen out and let them leak out on kitchen paper until they are completely dry. Serve warm or cold with lots and lots of powder sugar. The oliebollen will keep for 2,3 days, but they are best the first day. Keep them in a bowl covered with a towel.

Thursday, December 28

Great Presents and Late Cookies

Happy 4th Christmas day! ;)
[Sigh] The presents are unwrapped, the family is gone, the Christmas tree has lost most of it’s special-ness, and you’re probably still full from all the loads of food.
Finally, everything is becoming calmer. Now starts a bit of that peacefulness. You survived the big stress and it’s now time to relax… How about some more cookies? Just kidding.

The true Christmas thought isn’t of course about presents or mountains of food, but it is a nice side issue.
It’s far from necessary, but it is a great opportunity to do something extra for your loved ones, pamper them (a bit) with treats you know they would appreciate.
And you can’t believe how incredibly spoiled I got…

Not bad, eh? Thank you Santa(s) for all the beautiful, thoughtful presents! ;)

But it’s clear that these amazing books come with another problem.
In gods name, what should I make first?? It’s already impossible to choose from Hermé’s, how should I ever pick something out of three??
Luckily my vacation isn’t over yet, and as I’m a bit sick and spend most of my time in bed now, I have all the time to read them from cover to cover and amaze myself about their geniusness…

Back to other sugar, back to the Christmas Sugar Cookies! Although Christmas is over and I do think these are really Christmas-y cookies, I wrote down the recipe here below. They are so sweet, buttery and easy that I wouldn’t mind having them, lets say, on a February morning.
And you can make them of course easily less Christmas-y by replacing the cherries for something like chocolate chips! They make a nice present, and they are perfect for making ahead, as you make the dough in advance.

The Plaisir Sucres, Macarons, Croissants, Tarte Tatin, and who knows what more, (unfortunately) have to wait a bit more because first…it’s (almost) time for making the best oliebollen!

=> Haha, mine are way better than these!! ;)

Will be continued...


Christmas Sugar Cookies (makes a hundred!)
(From BBC GoodFood)
- 300g (1 ½ cups) granulated sugar
- 140g (1 stick and 2 Tbsp/½ cup and 2 Tbsp) butter, softened
- 2 eggs
- 1 Tbsp pure vanilla extract
- 2 Tbsp milk
- 550g (4 cups) flour
- 2 tsp baking powder
- ½ tsp salt
- 200g (1 cup) glacé cherries, chopped. (bigarreau)

1. In a large bowl, beat the sugar and butter together until pale and creamy. Gradually beat in the eggs, vanilla and milk.
In a new bowl, mix the flour, baking powder and salt together. Then add a few spoonfuls at a time to the butter mixture, stirring with each addition to combine. Fold the cherries through the dough, and shape into to logs.
Wrap the logs in cling film, freeze one and chill the other for at least 2 hour.

2. Heat the oven to 180°C (350°F) and line three baking sheets with parchment paper. (of course if you don’t have three, bake in batches)
Take the chilled logs from the refrigerator, unwrap, let warm up slightly, and use a large knife to slice rounds the thickness of a coin.
Lay the cookies out on the trays and bake for about 5 minutes until golden brown. Repeat this process for the other log in the freezer.
Cool on a wire rack before serving. The cookies will keep in an airtight container for up to 3 days.

Optional: spread the logs with some egg yolk and roll them though the sugar! Extra sugar cookies!

Saturday, December 23

Have yourself a...

I know it’s needless to say, but I’ll do it anyway:
It’s really almost Christmas now!
I hope this info is not new or comes with a shock for you, because otherwise I think it would be smart to make some plans and get going (!)
What are you doing this year with Christmas? A 15 courses menu? (it wouldn’t be a surprise with you foodies!) Eating out in a Michelin worthy restaurant? Nothing? Or like us, having a buffet with all kinds of little snacks and other tasty things?
I’m in charge of the dessert section this year -what else?- and decided to go for a few different sweets and desserts, simply because I couldn’t choose…
One of them is this rich chocolate cake with hazelnuts. This is the kind of cake that gets only better and better the longer you wait…perfect for Christmas!

I’m always careful in the kitchen - did you know 58% of all indoor accidents happens in the kitchen?! - but this time I was extra careful, as I still have last Christmas etched on my memory...
Last year me and my mom were hostesses, so on Christmas morning after breakfast and presents, we got back in the kitchen and prepared the final things for dinner. It was nice, but busy and slightly chaotic, and their was still a lot to do.
I was just making a piecrust: butter, flour and sugar were in the bowl, the hand blender was cheery grunting, and the dough was ready to be made into a bal. I putted down the blender and placed my hands in the bowl.
I wanted to have as well the last bit of dough that was sticking in the blender, so I, clearly without thinking, went for it.
10 minutes later we were, me still in my pj’s, at the first aid post. When my finger touched the blade, the power switched on and -luckily!- only my fingernail didn’t survive. Merry Christmas indeed! ;)

So this year I made sure nothing needed the blender…
I haven’t tasted this cake yet of course, -that would be rude!- so I can’t tell you how it tastes, but judging the ingredients, the look, the soft inside versus the crunchy outside, and the incredible smell, it’s only really promising…

Have a great time, merry Christmas everybody!


Chocolate Hazelnut Cake (for 10 till 12 people, adapted from La Dolce Vita)
- 250g (9oz) chocolate (minimum 70%)
-115g (1 stick/½ cup) butter, softened
- 5 eggs, split
- 140g (¾ cup) finely granulated sugar
- 50ml rum/cognac
- 100g fine maizena
- 150g (1 ¼ cups) hazelnuts, roasted

1. Preheat over to 180°C (350°F) and grease and flour a 22cm (9 inch) round cake pan.

2. In a small saucepan, mix the chocolate, broken in little pieces, and the butter over low heat till the chocolate is melted. Take the pan of the fire and let to cool a bit.

3. In a medium bowl, whisk the egg yolks and the sugar together to a thick, creamy mixture. Mix in the chocolate mixture, rum, maizena and hazelnuts until well blended.

4. Whisk the egg whites until stiff (but not dry!) and fold them carefully in the chocolate/hazelnuts mixture.
Scoop this mixture into the prepared cake pan and bake for 30 till 40 minutes.

The cake is ready when it’s dry and firm to the touch, but still a bit wet and silky inside. The top is as well cracked, but that’s how it should be.
Let the cake in it’s for until it’s completely cooled, take out on a serving plate and dust with powder sugar.
Optional: serve with a big dot of mascarpone and strong coffee…Yum!

Thursday, December 14

Almost

Sinterklaas has left the country, our (gigantic) tree is up, shining and smelling really nice, and I have finally time to spend some time behind the computer and post again.
It has been so busy lately…I’m glad it’s almost vacation - time for Christmas!
(who in the world can do math or French when you know you have to go to school for just one more week?!)

Did you know that Santa Claus is based on our Sinterklaas? Yes - they both refer to Saint Nicolas; a bishop who lived in the third century and became known for his generosity and love for children.
A big difference however, is that Sinterklaas still comes with a boat from Spain, and Santa Claus with a sledge from the North Pole. Sinterklaas comes along with his black ‘pieten’ and Santa Claus has elves…
Here in Holland you see around this time of year a sort of battle between Sinterklaas and Santa Claus, on who’s nicer/better…really strange when you know they are the same person!

Anyway, Saint Nicolas 1 is gone and it’s time for number 2! Christmas!
Time for a lovely, forest-y smelling house, twinkling lights, Christmas songs on the radio, snow (yeah right!), presents under the tree, and…making Christmas cookies!

Making Christmas cookies is such a relaxing, rewarding thing - and it will definitely bring you in the holiday spirit!
It’s easy, they smell amazing, you can make them in every kind of shape or flavour you want, and it’s really fun to decorate them in every possible way…

I made my basic recipe which is perfect and really hard to mess up, and when I was finished I added some of my favourite flavours.
I divided the dough into three, and kneaded into the first ball some salt and pepper, into the second ball some cinnamon and into the third ball some cacao powder…
They all turned out beautiful and perfectly crispy, but the cinnamon version was absolutely my favourite…delicious!

I made a sugar glaze and melted some chocolate, put on a Christmas cd and I got going with a whole load of decorations: candy pens, sprinkles, and lovely little silver, gold, and green sugar balls…
It was really calming (in these 3 hours I almost forgot all the schoolwork I still have to do…) and you will feel so proud and artistic if your cookie turns out good and pretty…
And the ugly, not so arty cookies? Ah…they’ll be quickly gone and forgotten… ;)

Christmas Cookies
- 300g (2 cups) all-purpose flour
- pinch of salt
- 2 tsp baking powder
- ½ tsp ground nutmeg, ½ tsp ground ginger, ½ tsp ground cinnamon
- 100g (½ cup, 1 stick) butter, softened and sliced
- 100g (2/3 cup) brown sugar
- 2 large eggs, beaten with
- 4 Tbsp liquid honey
glaze:
- 250g (2 cups) confectioner’s sugar
- 4 Tbsp boiling water
extra:
- 100g (1 bar) good quality chocolate
- sprinkles, candy pens, sugar balls, etc.

1. In a large bowl, mix together flour, salt, spices and baking powder. Add the butter and sugar, and mix with the electric mixer fitted with the paddle attachment, until crumbly. While the mixer is spinning, slowly add the egg/honey mixture. - Don’t pour in at once, otherwise there is a big chance you’re dough will be too sticky! - Pour in until you have a well blended, handable dough.
The dough is now ready. You can just use it like this (and go to step 2) or add some spices/flavours.
This is what I did:
Divide the dough into three and put the three balls into different, small bowls. Add to bowl 1 a good pinch of salt and 1 teaspoon of pepper. Knead this into the dough. Do this as well for bowl 2 and 3, adding 1 tablespoon of ground cinnamon, and 2 tablespoon of cacao powder.

2. Beat each ball down to a disc and wrap into plastic. Refrigerate for at least 15 minutes.

3. Preheat oven to 170°C (340°F) and line two baking sheets with parchment paper.
Flour your work surface, and take out the first disk of dough.
Roll out thinly, keep flouring (it can be a bit sticky) and cut out the cookies - or if you don’t have cookie cutters, just carve them out with a sharp knife. Transfer to the baking sheet and make a small hole in each cookie so you can hang them in the tree.
Knead the leftovers together, roll out again and cut out more cookies. Do this until you have no more dough left. Do this as well with the other two flavours.
You can also put a bit of chocolate and cinnamon dough together and make fusion cookies! (see the last picture)

4. Bake for about 10 minutes until the bottom is golden brown. But keep checking them during the baking! Let cool completely and make the glaze, or store in an airtight container.

Glaze:
1. Mix the confection’s sugar with the boiling water, adding each spoon of water after the previous one is well blended, until you have a silky, thick glaze.

Melt the chocolate, while stirring, in an heatproof bowl.
Get out a few clean spoons, kitchen paper and the decorations…and get creative! ;)


Saturday, November 25

1 + 1 = 3

Sometimes is 1+1=3
These Chocolade Stroopkoeken (chocolate treacle cookies) are a classic example for this. They are not just two crispy chocolaty cookies fused together with some hot, creamy, salted treacle….but they are the best crispy chocolaty cookies fused together with some hot, creamy, salted treacle. They are amazing.
Make a hundred and you still want more, I guarantee.

The stroopkoek is a typically Dutch product. Only, undeserved, a whole lot less known then it’s brother the stroopwaffle. Although I can appreciate a hot, freshly made stroopwaffle from time to time, (especially with this colder weather) I prefer a stroopkoek. And then of course the version as shown here above: thinner, chocolaty and salted. Heaven.

I got them from Koekje, the cookie-bible I wrote about before. The recipe comes from Kees Raat (kind of logical since it’s a(n incredible) twist on the normal stroopkoek…) but I adjusted it slightly since I didn’t have pepper vinegar or zeeuwse flour (from Zeeland - a part of Holland) and because - let’s face it - I like it always just a bit more salty and chocolaty.

Two thin chocolate biscuits with the best salty caramel-y syrup which will make the cookies deliciously chewy and sticky. What do you want more? Enjoy immediately while the treacle is still hot. Try them and love them…;)


Chocolade Stroopkoeken
- 120g (1 stick/½ cup) butter, softened
- 60g (1/3 cup) dark brown sugar
- 60g (1/3 cup) white brown sugar (witte basterdsuiker)
- pinch of salt and pepper
- 1 tsp vinegar
- 1 egg, lightly beaten
- 200g (1 ½ cup) flour
- 4 big Tbsp cacao powder
- 1 big tsp baking powder
For the syrup:
- 100g (½ cup) stroop (treacle)
- 60g (1/3 cup) white brown sugar
- 60g (½ stick, ¼ cup) butter, softened
- 1 Tbsp sea salt

1. In a medium bowl, sift together flower, cocoa powder, baking powder, salt and pepper. Set aside. In a large bowl, mix butter, the two sugars, vinegar and egg. Add the flower mixture to the sugar mixture and knead it to a ball. Pack in foil and let rest in the fridge for at least one hour.

2. Preheat oven to 170°C (340°F) and line 2 baking sheets with parchment paper.

3. Get the dough out of the fridge and roll out thinly on a lightly flowered surface. (if it’s too sticky, use some more flower) you can best do this in 3 or 4 times as the dough will break easily.
With a round 10cm (4inches) form, - or a cute small one…- stick out cookies and line them on the baking sheets. Bake for about 10 minutes, until set and down. Let cool completely and make the syrup.

Syrup:
1. In a small saucepan over medium heat, melt treacle with sugar, butter and salt. Stir until well blended and let cool a bit.

2. Ladle syrup on the flat side of a cookies, move it a bit back and forth to even and close with a second cookie. Repeat with remaining cookies.
Enjoy immediately or keep in an airtight container for up to 3 days.

Wednesday, November 22

Going Dutch: Koekje

In Holland there are just a few really good, legendary, patissiers.
Two of them are Cees Holtkamp and Kees Raat.
They are both really different and yet the same;
Cees Holtkamp started in Amsterdam in 1969 and is famous for his simple, straightforward and traditional approach to baking.
Kees Raat opened his ‘Unlimited Delicious’ in Amsterdam 15 years ago and became known for his originality and uniqueness.
These two masters are now combined in one beautiful little book: Koekje. (Cookie)

I can’t believe Koekje wasn’t here earlier - it’s indispensable.
The concept is brilliant; Holtkamp wrote down his (50!) recipes for all the classic Dutch cookies, - such as stroopwafels, Arnhemse Meisjes, Goudse Moppen and Jan Hagel… - and Kees Raat gave each cookie his own, creative twist and came up with 50 brand new cookies as Chocolate Blini’s, Javaanse Jongens and Zeeschuim (!)


Koekje is a clear-cut, beautiful book with on every single page a picture.
I love that I now finally have a book where all the recipes for good Dutch cookies are bound together.
And I’ve discovered so many new, which are in fact old, recipes(!)
Who still knows how a Haarlems Halletje or Nonnenscheetje taste?
And Haagsche Wind??
Haagsche Wind (Wind of the Hague) dates all the way back to 1880. Living in The Hague and never having tried it - how could I not make it?

(Plus it was a wonderful opportunity to use my new pastry bag from la Bovida that I still hadn’t used since my trip to Paris…!)

Haagsche Wind is a sweet little meringue cookie with cute looking almonds on top. It’s one lovely cloudy bite: crunchy on the outside and soft and airy inside.
Meringues are well loved in my family.
I once tried to make meringues, but it didn’t work out so well - this recipe however, is a keeper.

99 recipes left in ‘Koekje’…what will I make next?


Haagsche Wind
- 3 egg whites
- 150g (¾ cup) finely granulated sugar
- 100g (½ cup) confectioner’s sugar, sifted
- 100g (1 cup) almonds, lightly roasted and roughly chopped

1. Preheat oven to 120° C (248° F) and line one baking sheet with parchment paper.

2. Beat, with an electric mixer, egg whites until frothy. Gradually add granulated sugar and mix until well blended. Beat in the confectioner’s sugar carefully until the mixture is white and glossy.

3. Fill pastry bag (with a 2cm, 1 inch tip) with the mixture and drop little dots on the prepared baking sheet. Sprinkle with the roasted almonds and bake for 20 minutes until set. Let cool completely before enjoying and store in an airtight container.


Holtkamp
Vijzelgracht 15
1017 HM Amsterdam

Unlimited Delicious
Haarlemmerstraat 122
1013 EX Amsterdam

Tuesday, November 14

Nuts...

My new camera is driving me nuts.
It’s so pretty and I really love it but I’m beginning to get a little desperate.
It doesn’t matter what I do - all my pictures are either too light or too dark and too blurry or too dim. I really hope it’s just a temporary problem and I just haven’t figured out the light focus or something like that…

So under the impression that at least one of my 158 photo’s was good, and without further checking, I started tasting and…
all the cashew-caramel cookies disappeared quickly.
And this was the best picture in the bunch.
I’m sorry I can’t let you better see how incredibly delicious these cookies were…

Because they weren’t just good.
They were really, really good.
I know it’s a bit strange, but you make me most of the time happier with a good spoon of cookie dough then the cookie itself…
Well, these nut cookies are like the best cookie dough ever.
They are chewy, not too sweet, and the cashews are lovely caramelized in the oven. They have a good bite, a delicious sugary bottom and an amazing soft caramel swirl on top…oftewel; echte door-etertjes! (so it’s really hard to stop eating these…!)

I found the recipe online at MarthaStewart.com but I made some big changes in the process so I typed out what I’ve done here below.
If you want to check out the original recipe; click here

I don’t have a decent electric mixer to grind cashews with, only a puree mixer with a sharp blade which will make the nuts fly and spring everywhere (I have btw a rather horrific Christmas story about this blade - but that maybe for later…) so I just chopped 1 cup finely and kept the rest in big chunks. This worked out really well as I may say so.
For some reason I wanted to add pear as well. Don’t ask me why, I just had a feeling. It turned out to be a wrong feeling; there was absolutely no trace of pear in these cookies. Not that's incredibly terrible, I think they are pretty perfect just like this…
I kept the pear in the recipe what so ever - who knows how they would turn out without it??


Cashew Cookies (makes 24)
- 200g (1 ¾ cups) all-purpose flour
- ½ tsp salt
- 350g (3 cups) roasted, salted cashews
- 4 Tbsp sunflower oil
- 115g (1 stick, ½ cup) butter, softened
- 115g (¾ cup) packed light-brown sugar
- 100g (1/2 cup) granulated sugar
- 1 egg
- 1 tsp pure vanilla extract
- 1 pear
- 24 cubes soft caramel candy (200g, 7 ounces)
- 65ml (1/4 cup) heavy cream

1. Preheat oven to 180°C. (350°F)
Mix flour and salt together in a small bowl and set aside. Finely chop 1 cup cashews and transfer them to the bowl of an electric mixer fitted with the paddle attachment. Add butter and sugars and mix on medium speed until fluffy. (about 2 minutes)
Mix in egg, vanilla and oil. Reduce speed to low and gradually add flour mixture. Wash and dry the pear and thinly slice it with a cheese-slicer. Chop these slices into even smaller bits and mix it in with the reserved, roughly chopped cashews.

2. Shape dough into 4cm (1 1/2-inch) balls; space 5cm (2 inches) apart on 2 parchment-lined baking sheets. Bake 6 minutes and gently flatten with a spatula. Bake until bottoms are just golden, 6 to 7 minutes more. Let cool completely.

3. For the caramel, melt caramels with cream in a small saucepan over low heat, stirring. Let cool. Using a spoon, drizzle caramel over cookies and let set. Store the cookies in an airtight box in single layers.

Tuesday, November 7

No Fuss, No Worries: Only Cake

I’d forgotten the power of a good basic cake.
Like a Pavlov reaction, I thought instinctively of the margarine, soppy, flavourless version that you can buy at the store. The one that doesn’t even deserve the name cake and will keep till end 2010...
What was I thinking??

Pound cake is the best. Or more precisely; Madeira cake is the best.
And this version is even better; it’s so easy, has a lovely lemony twist and a divine sugar topping that really gives the extra touch.
A crunchy layer with a big crack down the middle, covering a soft and slightly moist, amazing cake that will melt deliciously in your mouth…

The recipe comes from Nigella Lawson’s How To Be A Domestic Goddess, i.e. my first cookbook. My collection has, as you might have noticed, grown considerably since then but it still has a special spot with me.
I made this cake from it quite some time ago on request. I was actually already forgotten it but (luckily) came across the pictures when I sorted out my files. This is a wonderful cake, even the best in its sort I think.
Well, try and judge yourself…


Cake (for 8 to 10 slices)
- 240g (2sticks/1cup) soft butter
- 200g (1cup) finely granulated sugar, plus more for topping
- zest and juice of one lemon
- 3 eggs
- 210g (1 ¾ cups) self raising flour +
- 90g (¾ cup) all-purpose flour

1. Preheat oven to 170°C (330°F) and butter and line a cake form with parchment paper.

2. Stir butter and sugar until creamy and add lemon zest.
Mix in one egg, then one tablespoon of flour, then an egg again…and so on.
Add the rest of the flour, mix well, and add the lemon juice. stir until well combined.

3. Pour the batter in the prepared form and sprinkle generously with sugar (about 2 Tbsp) Bake for 1 hour, until a toothpick inserted into the centre comes out clean. Cool completely, then invert onto a serving plate.

Wednesday, October 25

A Great Weekend

My little half-sister Katoo is the ultimate chocolate monster. She’s almost 4 now and this weekend she came to visit her two big sisters in the city. These two days were way too short and we had, as always, a wonderful time. We absolutely spoiled her to dead now we had the opportunity, we got her some little girly presents, we watched Cinderella, went out to the bakery, danced, watched some more Cinderella and of course devoured a whole lot of chocolate…

That’s why I made these cupcakes. It’s clear it can’t get more chocolaty or sweeter than this; these cupcakes contain melted chocolate, cacao powder and chocolate chunks, along with the best chocolate frosting and some Smarties on top.
And they tasted absolutely great.
Sweet, brownie-y, and perfectly between dry and moist. They are also very nice without the frosting but that first bite in a frosted one, when your teeth go through the glaze, then the dry, crumbly top and finally threw a delicious moist inside…
Well, nothing will beat that.
And I’m happy I wasn’t the only one who liked them…

A weekend with cheery Tootje is always a pleasure, but this weekend turned out to be even better when Saturday morning the bell rang and my brand new camera had finally arrived(!)

It’s the Olympus E500 and it’s without a doubt the best toy ever!
I’m now like an annoying paparazzi photographer, walking through the house going click, click, click
And the quality of my pictures - every shot looks like it popped right out a professional photographer catalogue(!)
I love it! Can’t wait to get going and discover all it’s features…=)

Oh yes, one last thing about the cupcakes -
Make sure you buy enough Smarties if you have a specific colour in mind; my plan was to decorate them only with pink Smarties - well, every package contained about 3 pink ones…

A little Smarties fact to end with; Did you know 17 thousand Smarties are eaten every minute in the UK?
You sure can decorate a whole lot of cupcakes with that…(!)
Enjoy! ;)


Chocolaty Chocolate Cupcakes (makes 24 cupcakes)
- 150g (5,4 ounces) bittersweet chocolate
- 250g (1 cup/2 sticks) butter, cut into pieces
- 350g (1 3/4 cups) sugar
- 5 eggs
- 120g (1 cup) flour
- 4 Tbsp cocoa powder, unsweetened
-1 1/2 tsp baking powder
- pinch of salt
- 150g (5,4 ounces) chocolate chips, or bittersweet chocolate, cut into little pieces.

1. Preheat oven to 180°C (350°F) and prepare 24 cupcake cups on a baking sheet.

2. In a large saucepan, melt chocolate and butter while stirring. Add sugar, stir until blend completely, and let cool for 10 minutes.

3. In another bowl, sift together flour, cocoa powder, baking powder, and a pinch of salt. Set aside.

4. With an electric mixer, beat chocolate mixture for about 2 minutes. Add the eggs, one at a time, and make sure each one is completely absorbed before adding the next.

5. Add flour mixture to chocolate mixture and mix well. Scoop into the prepared cupcake cups - this is easy with a ladle - and bake for 25 minutes or until a toothpick comes out clean.

Store in an airtight container or continue with the frosting.


Chocolate frosting (enough for 24 cupcakes)
- 250g (9 ounces) bittersweet chocolate, chopped
- 250ml (1 cup) heavy cream
- 1 tsp vanilla
- 1 Tbsp butter, room temperature
- 300g (2 cups, packed) powdered sugar

1. In a medium saucepan, heat cream until bubbles form around the edge of the pan. Reduce heat and add the chocolate. Let stand for one minute, then stir to combine. Add butter and vanilla and mix well. Remove from heat and let cool for 10 minutes.

2. Sift powdered sugar into the mixture and beat with an electric mixer until combined. Continue to beat until light and creamy. This frosting can be made in advance and kept in the refrigerator. Before piping on the cupcakes, let stand for a few minutes or pop it for 20 sec. in the microwave.

4. Fill pastry bag with the scoopable frosting and pipe onto the cupcakes. Decorate with smarties/m&m’s before the frosting is completely hard. Store in an airtight container.
These cupcakes will stay for an surprisingly long time good - even on the 5th day they taste heavenly…


Tuesday, October 17

Autumn Weather…Time for Cookies

Summer is definitely over. And it happened so quickly;
The streets are rainy and the trees transformed from green to all shades of yellow, orange and red. It’s still dark outside when I wake up in the morning, I need a scarf on when I go to school and I hate that the wind has become so cold and raw…
The plus side however, is that it’s time for candles, tea, electric blankets and wearing comfy ski socks again(!) (and almost time for oliebollen!)

In the summer nothing beats a fresh, sour apple, but with this weather I prefer baking; the wonderful perfumes filling the house, the apples becoming all soft and oozy in the oven, their hotness and perfectly sweetness…

These Apple Cookies are great and have al the above.
They are granola-y and hearty, with delicious crispy edges and a soft apple-ish inside.
I start with the edges, slowly nibble them off, work my way in, and finish with one soft and gooey last bite…
These cookies are robust, sweet and spicy, and really substantial - great for those chilly days…


Apple Cookies (makes about 30)
- 240ml (1 cup) apple juice
- 200g (1 cup) currants
- (250) 2 cups whole-wheat flour
- 1 tsp baking soda
- 1 tsp ground cinnamon
- 1 tsp ground nutmeg
- 1/2 tsp salt
- 225g (1 cup/2 sticks) unsalted butter, room temperature
- 300g (2 cups) dark-brown sugar, firmly packed
- 1 egg, room temperature
- 250g (2 1/2 cups) rolled oats
- 5 crisp and tart apples, I used granny smith
Granulated sugar, for sprinkling (optional)

1. Heat the oven to 180°C (350°F) and line a baking sheet with parchment paper.
Heat cider in a small saucepan to a simmer. Place currants in a bowl and pour the warm cider over them. Let plump at least for 10 minutes.

2. Mix in a small bowl together flour, baking soda, cinnamon, cloves, nutmeg, and salt. Set aside.

3. In the bowl of an electric mixer fitted with the paddle attachment, cream together butter and brown sugar until fluffy. Add egg, and continue beating until well blended.

4. Add the dry ingredients, beating until just combined. Add the currants with half of the cider and oats until just combined. Using the largest holes on a box grater, shred 2 apples directly into the dough, rotating to avoid seeds and core. Stir well to combine.

5. Using two spoons, scoop out cookies and place on the prepared baking sheets about 2 inches apart. Using a sharp knife, slice 2 or 3 apples very thinly. Remove core with a cookie cutter or with a knife (you can make all sorts of fun figures…) Place a thinly sliced apple ring on top of each cookie and sprinkle with a pinch of sugar, if desired. Bake in the heated oven until dark brown, 18 to 20 minutes. Repeat with the remaining batter. Let cool completely before storing in an airtight container. Can be stored for 3 days - but be warned, they will soften and soften and...

Monday, October 16

Make you Banana Pancakes...


Scrambled eggs with white beans in tomato sauce, a few slices of buttered toast, a croissant, or a big delicious tower of pancakes…
The possibilities are endless and it’s the most important meal of the day…
Breakfast
Although I’m always quite satisfied with my coffee, yoghurt and freshly squeezed orange juice, this morning it was time for a change.
It was time for pancakes.

I've always loved Jack Johnson’s song Banana Pancakes, and every time I hear it I just start craving for banana pancakes…
So of course I made banana pancakes.
Banana pancakes with buttermilk and a drizzly of honey to be exact.

I’ve eaten pannenkoeken, - A pannenkoek is the Dutch version of a pancake; larger and thinner and served with sugar and treacle… - crepes and blini, but I’d never ever eaten pancakes. let stand for breakfast.
I got my recipe from America’s absolute Baking Queen, Martha Stewart, and I served them with a big dot of crème fraîche and honey instead of maple syrup. This was a lovely - and quite heavy - breakfast that I really enjoyed…

I had a bit of trouble at first with the recipe. or not with the recipe, but jut with pancakes in general; some of my first batch got really messy and burned a bit because I left the heat on too high - luckily I figured it out after a bit of practise and after this I made absolutely beautiful perfect golden-brown pancakes…

They were soft and sweet, had crispy edges and a luscious fluffy and oozy centre from the hot and slightly melted banana slices. Drenched in the honey this big golden-brown heap was a wonderful festive way to start my day…

Banana pancakes (makes 12)
- 120g (1 cup) whole-wheat flour
- 3 Tbsp light-brown sugar
- 1/2 tsp baking powder
- 1/4 tsp baking soda
- 1/4 tsp salt
- 240ml (1 cup) buttermilk
- 1 egg, lightly beaten
- 11/2 Tbsp butter, melted
- vegetable oil
- 2 ripe bananas, thinly sliced
- crème fraîche, maple syrup (or honey) and chopped walnuts, for serving (optional)

1. Preheat oven to 135°C (250°F). In a large mixing bowl, combine flour, sugar, baking powder, baking soda, and salt.
Whisk in buttermilk, egg, and melted butter until batter is well combined and free of lumps.

2. In a large non-stick skillet over medium heat, swirl oil to coat bottom of pan. Working in batches, add batter in 1/4-cup portions. - I got 3 pancakes per time - Top with banana slices, dividing evenly. Cook until golden brown and tiny air bubbles form evenly on top, 2 to 4 minutes. Reduce heat if browning too quickly. Flip pancakes, and continue cooking until slightly puffed, 2 to 5 minutes.
Transfer to a baking sheet and keep warm in the oven while you cook remaining pancakes.

3. Serve pancakes with crème fraîche, honey (or maple syrup) and some chopped walnuts.

Wednesday, October 11

Wednesday Baking IV: No Baking

If you are a regular reader, you’ve already read about my beloved Wednesday Baking.
Clearly, this was too good to be true - schoolwork is really kicking in (and piling up ridiculous quickly…) and my new school period starts already next week.
From now on my Wednesday morning will be spend with maths, physics and chemistry. Great. Definitely an improvement…(!)

My plan was to make something really spectacular, over-the-top and impressive for this last Wednesday Baking.
Something like a 20layercake or perhaps try to make my favourite macarons…
well, this plan failed rather badly as I - strangely - wasn’t at all in the baking mood. I just wanted to spend this last free morning in my pj’s curled upon the couch. Eat far too much kruidnootjes, spoon away something sweet and watch many, many Friends episodes…

Friends is the best. I even dare to say me and my sister are the biggest Friends fans ever - we have watched every episode approxiately a hundred times (and I can watch them at least another 100 times…) and just like baking, this is one of my favourite, most relaxing things to do.
The last few weeks however, I hadn’t have the time (or peace) to just sit down, do nothing and watch. You can understand this morning was really needed, and I happily relived Ross and Rachel’s drama story…

So this Wednesday Baking Day was really No Baking Day - just something easy, quick, really satisfying and with a good sugar kick was needed today.
The answer was Chocolate Mousse

Intensely chocolate flavoured, exactly sweet enough and delightfully fluffy, this recipe was great. Pillowy, velvety and melting wonderfully on your tongue, this was exactly what I needed.
My homework will just have to wait a little bit longer…;)


Chocolate and a big pile of friends episodes….
Could this BE any better? ;)


Bitter Chocolate Mousse (makes 8)
- 250g (9oz) good quality, bittersweet chocolate, chopped
- 30ml honey liqueur (or brandy)
- 25g (1oz/2 Tbsp) butter, cut into pieces
- 4 eggs, separated
- 90ml (6 Tbsp) whipping cream
- 45g (3 Tbsp) sugar
- whipped cream, some chopped hazelnuts and cocoa powder to decorate.

1. Place the chocolate and 4 tablespoons (60ml) of water in a medium saucepan. Melt over low heat, stirring until smooth. Remove pan from heat and whisk in the liqueur and butter.

2. With an electric mixer, beat the eggs yolks until thick and creamy, then slowly beat into the melted chocolate until well blended. Set aside.

3. Whip the cream until soft peaks form and stir a spoonful into the chocolate to lighten it. Fold in the remaining cream.

4. In a clean, grease-free bowl, using an electric mixer, beat the egg whites until frothy. Sprinkle over the sugar and continue beating until the whites are stiff and glossy.

5. Using a large metal spoon, stir a quarter of the egg whites into the chocolate mixture, and then gently fold in the remaining whites until just combined.
Gently spoon into 8 individual cups and chill for at least 2 hours until set and chilled.

6. Scoop a big spoon whipped cream (beaten with a tablespoon of sugar) on top, sprinkle some chopped hazelnuts on top and lightly dust with cacao powder.


Sunday, October 8

Spinach Risotto with Goat’s Cheese

For my 25th post, my mum got me a very, very nice present; ‘Cook with Jamie, My Guide to Making You a Better Cook’ !
I read about this new book a few days ago, told my mum I really liked it, and as a surprise she immediately went out and bought it for me… =)

Cook with Jamie (already his 7th book!) is a beautiful - 450 pages thick - kitchen bible and is divided in 6 chapters; salads, pasta, meat, fish, vegetables and desserts.
Each chapter begins with a little info about the ingredient, a good basic technique and some handy tips and tricks. The principle is to first master the basics, be able to make the fundamentals for good authentic food, and than start mixing and experimenting and let all the flavours flow with about 8 different variation recipes, all made from that first basic recipe.

Become Jamie’s student in your own home…(!)

I absolutely love this book. I’ve always liked Jamie Oliver and his TV shows, I think he’s a great guy with his school dinners and 15 project, but I didn’t really like all his commercial stuff; tefal series, flavour shakers, table wear and god knows what.
I’m glad this book is simply about good food, learning and enjoying it.

Wanting to use my lovely new book immediately, I made this Spinach Risotto with Goat’s Cheese as a surprise Saturday night dinner.
Making risotto isn’t difficult at all.
You just have to have some timing and patience, since you really have to stand the whole time next to the pan - My rice was cooked exactly long enough; soft and oozy but still with a good bite.

I’m not really used to make something that doesn’t involve baking or isn’t sweet, but I have to say I really like it. Especially if I get an outcome as this…!
Intensely flavoured, slightly perfumed from the wine, a bit cheesy and wonderfully creamy. What’s a better dinner than a big, hot and steamy bowl of risotto mixed with soft spinach, slightly sour goat’s cheese and a bit of tangy lemon??


After making the basic risotto recipe, the rice will be ready for 75%
The idea is you’ll finish it off with a following recipe
Perfect if you have people over for dinner - make the base in advance and just leave it until you need it!


Spinach Risotto with Goat’s Cheese
based on Jamie Oliver’s recipe from Cook with Jamie.
(according to Jamie it serves 8, but if you want a good hearty portion, don’t count on more than 4 or 5 portions!)

ingredients for the basic risotto:
- 1 Litre (1 ¾ pint) vegetable stock
- 2 Tbsp olive oil
- 1 Tbsp butter
- 1 large onion, peeled and finely chopped
- 6 sticks of celery, trimmed and finely chopped
- 600g (1lb 6oz) risotto rice
- 250 ml dry white wine

extra ingredients for the spinach risotto with goat’s cheese:
- 75g (2/3 stick, 1/3 cup) butter
- olive oil
- 1 clove of garlic, peeled and chopped
- nutmeg, for grating
- 250g (9oz) spinach, washed and dried
- sea salt and freshly ground pepper
- 700 ml (1 ¼ pint) vegetable stock
- 1-2 hands freshly grated Parmesan Cheese
- ½ a lemon
- 200g soft goat’s cheese, crumbled
- extra virgin olive oil

Basic risotto:
If you make the risotto in advance, oil a large tray and set aside.

1. Bring the stock to a simmer in a saucepan.
Put olive oil and butter in an other large pan, add onion and celery and cook very gently for about 10 minutes, without colouring, until soft.

2. Add the rice and turn up the heat - keep the rice moving
Pour in the wine and keep stirring all the time until all the alcohol has evaporated, leaving the rice nicely perfumed.

3. Add the stock to the rice a ladle at a time, stirring and waiting until it has been fully absorbed before adding the next. Turn the heat down a bit to prevent cooking the rice to quickly, (the inside will than be very hard!) and continue to add ladlefuls of stock until it has all been absorbed. This takes about 15 minutes. The rice now begins a bit to soften, but is still quite hard.

4. Scoop the part-cooked rice out on the waited oiled tray, spread it out evenly and not to thick (otherwise the rice will cook itself!) and put the tray somewhere to cool down.
When it’s completely cooled, scrape it carefully all in a Tupperware container with a lid and keep it in the fridge until you want to use it.
The rice will keep for a couple of days.

Now you’ll have a perfect risotto base. Finish it off with the following recipe;

Spinach Risotto with Goat’s Cheese:

1. Heat a medium saucepan, spoon in a tablespoon of the butter and add a splash of olive oil, the garlic and a good grating of nutmeg.
When the butter has melted, add the spinach. Cook for 5 minutes, moving it until it’s wilted down. A lot of the liquid will cooked away and a dark intensely flavoured spinach will be over. Chop finely and season with salt and pepper to taste. Heat up your stock in a medium saucepan (the same one) and bring to a simmer.

2. Put a different large saucepan on medium high heat and pour in half the stock followed by all your risotto base. Stirring all the time, gently bring to a boil, and cook until most of the stock has been absorbed. Add the rest of the stock a ladle at the time until the rice is cooked. (check and taste when it’s perfect and a real pleasure to eat - still holding it‘s shape but also soft, creamy and oozy)

3. Turn off the heat, and stir in your spinach, butter and parmesan. Add a good squeeze of lemon juice, season with salt and pepper and leave the risotto to rest (with the lid on) for a minute. Fold in half of the goat’s cheese, stir well and scoop your portions on the plates. Finish off with the rest of the goat’s cheese, some lemon zest, a little drizzle of extra virgin olive oil and a bit of grated Parmesan…enjoy!

Thursday, October 5

Wednesday Baking III: Honey and Spice Cake

To keep my tradition going, I started my lovely free morning Wednesday again with some baking.
Because Wednesday Baking seems to be equal for using lots of raisins and cinnamon, I made sure this week’s recipe would also be loaded with both and ended up making a variation on Delia Smith’s Spice Cake.


Spice Cake is a true no fuss cake;
It isn’t very special or difficult to make - and I doubt it will ever win a beauty price - but in its simplicity, this cake is really irresistible and tastes so incredibly good.
If you just want something simple with a special twist; this is definitely your cake.

I substituted the candied peel for raisins and increased the amount of honey. This honey was just faintly traceable but did give it its nice and soft texture.
This cake is crumbly, spicy, extremely flavourful and has a lovely orange hint. The fresh and tangy lemon icing pairs beautifully with it;
perfect with a nice cup of tea for one of those cold autumn days.

p.s.
Tasting Life is silver! Yes, already 25th posts (!) Absolutely nothing, if you compare it with certain other blogs, but I‘m still very glad I even got this far. I keep learning and having fun so… up to the 1000th! ;)


honey and spice cake
- 100 g (1/3 cup) clear, runny honey
- 1 tsp ground ginger
- 2 tsp ground cinnamon
- 225 g (8 ounces) all-purpose flour
- 75 g (3 ounces) golden caster sugar
- finely grated zest 1 orange
- finely grated zest 1 lemon
- 110 g (1 stick/1/2 cup) butter, room temperature
- 1 egg, beaten
- 1 tsp baking soda
- 150g (¾ cup) raisins
icing:
- 175 g (6 ounces) icing sugar
- 2 Tbsp lemon juice + 2 Tbsp warm water

1. Preheat oven to 170°C (325°F) and lightly butter a 20 cm (8 inch) round cake tin.

2. Put the honey in a small bowl. Place this bowl into a saucepan containing almost boiling water and warm up the honey a little. (not too much, just a little)

3. Sift spices and flour into a large mixing bowl. Add sugar, orange and lemon zest. Now add the butter in small pieces. Rub it lightly into the flour with your fingertips, until the mixture becomes crumbly. Using a fork, lightly mix in the beaten egg, followed by the warm honey.
In a small bowl, mix the baking soda with 3 tablespoons of cold water, stir until dissolved, and add it to the cake mixture. beat, quite hard, until the mixture is smooth and soft.
Stir in the raisins and spoon the mixture into the prepared tin, spreading it out evenly. Bake the cake for about 50 minutes, until well risen and firm to the touch.
Let cool for 10 minutes, then turn it out on to a wire rack to cool completely.

4. For the icing; sift the icing sugar into a bowl, add 2 tablespoons of hot water along with the lemon juice and mix to a thin consistency that will coat the back of a spoon. If you don't think it's thin enough add a little more water.
Now place a large plate underneath the cake on the wire rack and pour the icing all over, letting it run down and coat the sides a bit.
Store in an airtight container.


Monday, October 2

Paris Time: Chocolate Éclairs

I love watching TV series while I peel peanuts, my cat Romeo, morning fog, cherries, the smell of Christmas trees, my family -
But I as well love Paris.
Nothing overdramatic or something to exaggerate, but still a kind of special, distinctive feeling which I can not really explain. My tummy flips when I’m daydreaming about living there and I just simply want to be in Paris -

Well, maybe you’ve already noticed my count down here on the right… but in 24 days I will be on my way to Paris; city of lights and love, shopping paradise and gourmet walhalla (!)
I can’t wait to stroll down the Champs Elysee, taking the Paris metro, having some macarons again, sipping on my café au lait, exploring the different arrondissements a bit better and purchase some new winter fashion - which nobody will have here in Holland, wha-ha... -
I’m going for 3 days with my mum and sister and I can’t wait - (and it will be a true miracle if I will get to see and do everything that’s already on my list…)

I’ve only been 2 times in Paris, both for my birthday - when I was 10 and last year, for my 15th birthday. To get (even more) in the Paris mood, I decided to try and make éclairs. Chocolate éclairs.
I only have had 3 or 4 éclairs in my life; all in Paris at Fauchon, Maison du Chocolat and bakery Paul.
So the stakes and expectations were rather high…

Luckily the whole process went very smoothly and as you’ve already seen on the first photograph…
my own éclairs turned out beautifully and very delicious.
They are not quite yet in the same league as Fauchon’s, but this is truly a great recipe and it did give a real similar feeling as the one from last year…

I actually don’t really like custard or things filled with pastry cream - I’m not that keen on profiteroles or millefeuilles
but this cream filling - o my god
This pastry cream is different, slightly vanilla-infused and it is much lighter, as a result of adding whipped cream into the batter.
This is very nice, and will make it possible to devour 5 or 6 Éclairs easily without needing any pause…

It was a lot of work, definitely if you compare it with the time it took to gobble them down…, but all worth it.
And who knows…if things go as I want, maybe you can have one someday at JULIA instead of Fauchon… ;)


Chocolate Éclairs (makes 30)
Pâte à choux:

- 115g (1stick/½ cup) butter, cut into pieces
- 1 tsp sugar + ½ tsp salt
- 150g (1 ¼ cups) all-purpose flour
- 4 large eggs (plus 1 egg white, if needed - I didn’t need it)

Pastry cream:
- 500ml (2 cups) whole milk
- 100g (½ cup) sugar
- ½ vanilla bean, split lengthwise, seeds scraped (or 1 tsp vanilla extract)
- pinch of salt
- 4 egg yolks
- 75g (¼ cup) cornstarch 2 Tbsp butter, cut into small pieces

Chocolate glaze:
- 170g (6 ounces) bittersweet chocolate, finely chopped
- 565ml (2 ¼ cups) heavy cream
- 1 Tbsp honey

1. Begin with the pastry cream:
In a medium saucepan, combine milk, half of the sugar, vanilla and salt.
Cook over medium heat until mixture comes to a simmer.

In a medium bowl, whisk together the egg yolks, cornstarch, and remaining sugar. Whisking constantly, slowly pour 100ml (½ cup) of the hot-milk mixture into the egg-yolk mixture. Continue adding milk (100ml/½ cup at a time) until it has been incorporated.

Pour mixture back into the saucepan, and cook over medium-high heat, whisking constantly, until it thickens.
Transfer to the bowl of an electric mixture fitted with the paddle attachment. Add the butter, and beat on medium speed until the butter melts and the mixture cools, about 5 minutes.

Cover with plastic wrap, pressing it directly onto the surface of the pastry cream to prevent a skin forming. Refrigerate until chilled, about 2 hours (or up to 2 days!) just before using, beat on low speed until smooth.

2. The pâte à choux:
Preheat oven to 210°C (425°F)
In a medium saucepan, combine butter, sugar, salt and 240ml (1 cup) water. Bring to a boil over medium-high heat, and immediately remove from heat. Using a wooden spoon, quickly stir in the flour until combined.
Return pan to medium-high heat, and cook, stirring constantly, until mixture pulls away from the sides, about 3 minutes.

Transfer mixture to the bowl of an electric mixer fitted with the paddle attachment. Mix on low speed until slightly cooled, about 1 minute.
Increase the speed to medium, and add the whole eggs, one at a time, beating until each is incorporated before adding the next. Test the batter by touching it with your finger and lifting to form a soft peak. If a soft peak does not form, the batter needs more egg. If you have added all the whole eggs and the batter still does not form a soft peak, lightly beat the remaining egg white, and add a little at a time.

3. Making Éclairs out of the pâte à choux:
Line two large baking sheets with parchment paper. With a ruler and a pencil, mark lines about 8 cm (3 ½ inches) long on the parchment paper, spacing them about 5 cm (1 ½ inches) apart. I got 15 on my sheet.
Turn parchment paper over, marked sides down (otherwise your Éclairs will have little lines on their back…!)

Fill a pastry back with pâte à choux and pipe along the lines on the prepared baking sheets - about 1 cm (½ inch) thick. Gently smooth tops with a wet fingertip to ensure even rising.


Bake for 10 minutes and reduce oven temperature to 180°C (350°F).
Continue to bake, rotating sheets halfway through, until pastries are golden brown, 25 to 30 minutes more. Transfer pastries and parchment paper to a wire wrack to cool completely.


4. Make the chocolate glaze:
Place chocolate in a heatproof bowl. (large enough that an Éclair could fit in lengthwise)
Heat 190ml (¾ cup) cream and the honey in a small saucepan over medium heat until bubbles begin to appear around the edges, about 5 minutes. Pour mixture over the chocolate. Let stand for 5 minutes, then stir until smooth. Let cool, stirring occasionally, about 5 minutes.

5. Filling the Éclairs:
With the same pastry tip (cleaned of course!) create a small hole on both sides of each shell.

Take the pastry cream out of the fridge and in a medium bowl, stir to soften.
In another bowl, whip the remaining 375ml (1 ½ cups) heavy cream to stiff peaks. Fold the whipped cream into the Pastry Cream in two batches to lighten.
Transfer to a pastry bag fitted with the same plain 1cm (½ inch) tip.
Insert the tip into the opening of each Éclair shell - both sides - and pipe to fill with the whipped pastry cream. You’ll feel when the Éclair is filled - you’ll feel pressure and the shell will be a lot heavier…

Dip the top of each Éclair into the chocolate glaze; let excess drip off, and place, coated sides up, on a wire rack set over a baking sheet.
Refrigerate Éclairs in a single layer in an airtight container until glaze is set, about 20 minutes or up to 2 days…


Wednesday, September 27

Wednesday Baking II : Carrot cake Muffins with Cinnamon Glaze…


It’s Wednesday today, and just like last week, I’ve had a lovely quiet morning today, filled with baking, a bit of blogging and a
lo-hot of tasting.
This morning I made Carrot cake Muffins.
I just realized this is again a recipe with lots of raisins and cinnamon (!) Talk about coincidence…=)

The recipe is from Delia Smith. I love her Vegetarian Collection - it’s a big, beautiful book with simple and complicated recipes and the most amazing photo’s - even a simple potato looks gorgeous in here.
According to Delia this is the absolute best carrot cake there is. She worked on the recipe for years, carefully analysed it and made a lot of little adjustment over the years.

Changing the recipe seemed very stupid and completely sacrilege, so I followed the instructions precisely...
My only adjustment was the use of little muffin tins instead of two large cake pans. I was very pleased with the outcome; they were a lot easier to make and don’t they look sweet??
I’m very glad I didn’t change a single thing: this is indeed the best carrot cake ever

It’s sweet, dense and spongy and still fairly healthy judging all the ingredients...
You can taste all the different ingredients and flavours, but what really special is, is that not one single thing dominates in this cake – all the lovely flavours work together and are simply a perfect match!

Although I liked the cinnamon glaze, I prefer the muffin served just plain with the syrup…I love this syrup - It’s without a doubt the best addition ever for a carrot cake. It will be perfectly moist (but not wet!) unbelievably sweet and so delicious…
well, you just have to try it yourself ;)


Carrot cake Muffins with Cinnamon Glaze (makes 18 muffins)
base:
- 175g (1 cup packed) dark brown sugar
- 2 eggs
- 1 ½ dl (2/3 cup) sunflower oil
- 200g (1 2/3 cups) self raising flour (wholemeal)
- 1 tsp baking soda
- 3 tsp mixed spices (cinnamon, cloves, ginger, nutmeg and white pepper)
- 200g (= 1 ½ cups packed, when grated) carrots, scraped and roughly grated
- zest of one 1 orange
- 100g (½ cup) raisins
- 50g (2/3 cup) grated coconut
- 50g (½ cup) pecan nuts
syrup:
- juice of one little orange
- 1 Tbsp lemon juice
- 75g (½ cup packed, minus 3 Tbsp) dark brown sugar
glaze:
- 125g (1/2 cup) mascarpone
- 100g (1/2 cup) fresh cream cheese (8%fat)
- 2 tsp cinnamon powder
- 3 tsp brown sugar
- 50g (½ cup) pecan nuts (for the topping)

1. Preheat oven to 200°C (400°F)
Make the cinnamon glaze first: whip all ingredients together until they’re creamy, cover with plastic foil and refrigerate for 1 to 2 hours.
Divide all the pecan nuts (100g) over a baking sheet. Grill for 6 minutes and turn oven back to 170°C (325°F)

2. Cut half of the amount of nuts roughly up for the cake base, and the rest very finely for the topping.

3. In the bowl of an electric mixer, mix sugar, eggs and oil for about 2 to 3 minutes, until sugar is completely dissolved. Sift flour, baking soda and mixed spices (put back the grains!) stir and add the ingredients to the cake base.

4. Butter and flour a muffin pan and a small cake pan. Pour base in forms (don’t fill them completely! About 2/3) and bake for 30 minutes, well risen and firm. When they stick to their forms, bake for another 2 to 3 minutes and check again. Leave them in their tins and make the syrup.

5. For the syrup: whisk together both citrus fruits and add in the sugar. Mix well. Prick (with a toothpick) little holes in the muffins/cake and divide and pour over the syrup.

6. Let cool completely. Take them out off their forms and spread (if you wish...) with cinnamon glaze. Sprinkle with chopped pecans and enjoy…

Saturday, September 23

Wednesday Baking: Cinnamon Raisin Bread


On Wednesday I’ve two classes plus my first one starts at two in the afternoon - no wonder my favourite school day is Wednesday.
I love I don’t have to set on the alarm and I can spend the whole morning wandering around alone and in my pyjamas.
It’s beginning to become a bit of a habit to use this time to keep my blog a bit updated and, maybe you already guessed, bake something.
When I wake up on this Wednesday morning, the house is empty and it’s completely silent.- I make my morning cappuccino in peace, turn on the radio and start leafing through my cookbooks (a bit drooling…) and looking for something to make.

This morning, absorbed in one of my favourite and most used cookbooks - Martha Stewart’s Baking Handbook - I spotted this recipe for Cinnamon Raisin Bread. I love cinnamon. It’s without a doubt my favourite spice, I put it always on my cappuccino and have the tendency to double or triple the amount that’s asked for in my recipes.
In short - this recipe sounded just perfect (especially with another cappuccino!) and I started my Wednesday morning baking session

I have to say - I hope I don‘t sound too cocky… - everything I’ve made so far from cookbook recipes with a picture, looked very similar or sometimes even identical, as my outcome.
The only real surprises came from the experimental baking…
Well, up till now. This time my making didn’t even look slightly as the picture out the book…

Martha Stewart’s picture of this Cinnamon Raisin Bread was light, airy and well, very breadlike. Although it was a bit of a shock mine wasn’t, - I think my yeast didn’t do his job so well... - it was yet one of the best, extremes things I’ve ever tasted. I can't imagine Martha’s version had been any better or have more flavour than my version…

It was delicious, I loved it. It was compact, a bit cookie-ish and soft, and completely perfumed with cinnamon and sugar. Luscious golden-brown and with an amazing over-the-top sweet sticky cinnamon-syrup-swirl inside. It’s indescribable. The texture was perfect and if you had told me about this filling, I know I wouldn’t have believed that so much goodness would all been inside.
I didn’t wait and let cool completely before slicing, and a slightly warm, thick stream of cinnamon sugar came oozing out. Is it possible to get it more sinful or delicious than that?

The dough itself was wonderfully soft and warm, and a real pleasure to knead.
But keep in mind this isn’t a recipe you finish in an hour or so, it will definitely take you a while with all the rising and rolling, so pick a good moment and take your time (!)

A bit obvious; don’t eat this bread as a quick snack out the hand or for example when you’re dressed in white and you don’t have any napkins. Guaranteed trouble. Do devour it however, in thin slices and with a nice cup of tea (and plenty of napkins...)


Cinnamon Raisin Bread (makes 2 loaves)
- 1 envelope (¼ ounce/7g) active dry yeast
- 480 ml (2 cups) warm milk
- 950g (6 ½ cups) all-purpose flour, plus more for dusting
- 115g (1 stick/½ cup) butter, room temperature, cut into pieces, plus more for pans
- 100g (½ cup) sugar
- 2 eggs, plus 1 egg, lightly beaten
- 2 ½ tsp coarse salt - 200g (1 cup) raisins
- 1 Tbsp ground cinnamon
filling:
- 300g (1 ½ cups) dark brown castor sugar
- 2 Tbsp ground cinnamon

1. In the bowl of an electric mixer, sprinkle the yeast over the warm milk and whisk to combine. Add the flour, butter, sugar, 2 eggs, and salt. Attach bowl to mixer fitted with the dough hook. Mix on low speed until all the ingredients are well combined, about 3 minutes. Raise speed to medium-low, and continue to mix until the dough is completely smooth and pulls away from the sides of the bowl, about 3 minutes more.

2. Turn out the dough on a lightly floured surface. Pat out the dough into a big round. Sprinkle with raisins and cinnamon and knead and fold until they are just incorporated. Place the dough in a lightly oiled bowl, and cover with oiled plastic wrap. Let rise in a warm place until doubled in size, about 1 hour.

3. Return the dough to a lightly floured work surface, and pat into a round. Fold the bottom third of the dough up, the top third down and the right and left sizes over, pressing down the seal. Return the dough into the bowl and let rise again until doubled in bulk, about 40 minutes.

4. Make the filling. Combine sugar and cinnamon with 2 Tbsp water in a small bowl.

5. Generously butter two 9by5-inch loaf pans (if you don’t have two, one 7 inch round spring form) set aside. 6. Return the dough to a lightly floured work surface, and divide in half. Roll each half out to a large rectangle, a bit bigger than your loaf pans - about 10 inch. Brush with beaten egg and sprinkle each with half of the filling.

7. With the short end of the rectangle facing you, fold in both of the long sides of the dough in. the roll the dough towards you, gently pressing forming a tight log. Roll back and forth to seal the seam. Place loafs in the prepared pans. Cover loosely with oiled plastic wrap, and let rest in a warm place, about 30 minutes. Meanwhile, preheat oven to 225°C (425°F)

8. Brush the tops of the loafs with beaten egg, and transfer pans to the oven. Bake, rotating pans halfway through, until loaves are golden brown, about 45 minutes. If the tops begin to brown too quickly, tent with aluminium foil.) turn out the bread onto a wire rack to cool completely before slicing. (if you can wait…) The bread can be kept, wrapped in plastic up to 4 days.